was successfully added to your cart.

Cart

Category

Boat Repair

There’s been a lot of changes with Boatworks Today over the past year!!

By | Boat Repair, General Updates, Uncategorized | No Comments

But I’m not going to turn this into a long winded post, instead just going to highlight some of the things that I’m most excited and thankful for 🙂

In short we moved from Wisconsin to Michigan, sold the old house and shop, built a new shop which is almost done (hoping to have that 100% finished in the next 3-4 weeks).  Attended the Newport Boatshow which was amazing!  Had a chance to meet hundreds of folks that have followed the channel for years, as well as had the opportunity to meet a number of other boating channels and hang out for a few days.  Very cool experiences!!

One other thing that’s been in the works for almost 2 years and finally came to fruition this Spring was that I became an online retailer for Alexseal Yacht Coatings!  If you’re not familiar with this paint, here’s a writeup that I did going into detail as to why;  without hesitation I believe this coating system is by far the best out there when it comes to 2 part paints.  Seriously, nothing else even comes close…  If you’d like to see how to apply and repair this stuff, here’s a couple playlists of working with this material.

If you have a project coming up and think this would be a good fit, HERE’S where you can order from  🙂  I should also add that if you’re a supporter over on Patreon you’ll be able to take 10% off the Alexseal order which is FAR more than what the Patreon subscription would be!  Spend $10 to save over $100 😉 If you’re into a project and would like some personalized help along the way I also offer that as part of the Patreon membership!

But with Winter officially here (at least in Michigan it is lol) for most in the Northern climates it’s probably not the best time of year to be doing a painting project, but the Holiday Season is right around the corner!  It’s been a few years since I’ve had any BWT merch in stock but I thought it might be worth having a few things on hand; mostly just hats for now.


If you’d like to get a stocking stuffer for one of your boating enthusiasts, these can be purchased HERE!   Use discount code 10%ForMe to save on your purchase (discount good through the end of 2022 🙂

Well, I started this post saying I wasn’t going to make this a mini-novel so going to wrap this up.  Have a safe and enjoyable Holidays!!

As always hope you’re doing well and Thanks For Watching :-)!!

~Andy

A New Fiberglass Guide And New Website!

By | Boat Repair, General Updates | 4 Comments

It’s been a while since I’ve done any actual updates about Boatworks Today; mainly because there really wasn’t anything too exciting to announce, but that has finally changed!

In this past week there has been a major over-haul of the website With ALL of that effort coming from Josh and Alyssa over at https://www.fortirisgroup.com/  They did an absolutely amazing job, and without question this new site is something that I never would have been able to do myself!  When you have a chance stop in and take a tour 😉  www.boatworkstoday.com

The other bit of big news is this past week I was finally able to finish a Fiberglass guide that I’ve been working on the past couple months! This is the first of what will likely be 6 downloadable guides each covering, in depth,  a different topic as it relates to fiberglass repair 

Please check it out and if it looks like something that would be helpful for your projects let me know what you think!! Also sharing this post with your boating friends is always much appreciated!

Thank you in advance and have a great week!!


Applying Gelcoat, Spray or Brush?

By | Boat Repair, Fiberglassing Tools and Supplies | 10 Comments

Getting to the point of applying your color matched gelcoat is one of the last steps in finishing off your repair(s). In the video I mentioned that there were 2 common ways to do this; spraying or brushing..

While brushing the gelcoat has it’s advantages, it isn’t always the best approach. For small patches such as chips, dings, scratches and small repairs I believe that it is the most efficient both in prep time and application. However in situations where the repair spot is much larger than what is shown in the video, spraying is definitely the way to go.

Looking at this option a little further, lets go over some of the options for equipment. The first thing that will be needed regardless of the type of spray gun used (we’ll cover this in a bit), is a large compressor. At a minimum a 3hp unit will be needed with a 60 gallon tank. This will provide most of the air needed with brief pauses to let the pressure build back up. Ideally, a 5hp unit will provide everything that you’ll require and then some; the compressor will be able to ‘catch up’ with the demand and occasionally turn off. 3HP units will run constantly and can tend to get a little ‘warm’ 🙂 However, they do work! It’s what I have and so far (knock on wood) haven’t run into any issues.

With that part of the equation in place, now it’s time to talk about guns. Keeping in mind that gelcoat is a resin that has a relatively short working time before it starts to set up (normally 10 min depending on the % catalyst used) I like to use guns that can be broken down quickly. For the most part, this boils down to gravity style guns and cup guns (aka dump guns).

Pictured below is an example of a cup gun. These types of units are an ‘industry standard’ for higher volume application needs. This particular unit is the ES-100, I believe the newer model is the ES-120.

ES-100 Cup Gun

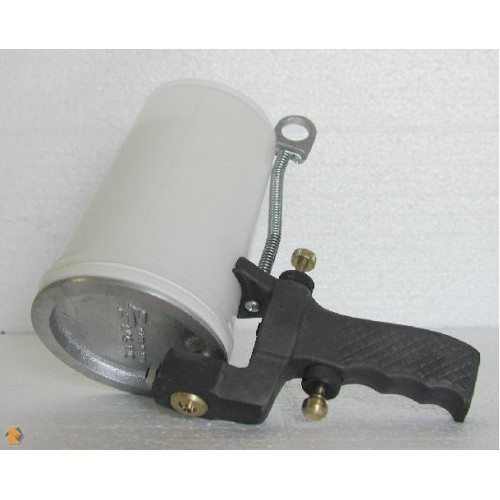
Advantages of this type of gun are:
– The gelcoat can be applied with very little to no thinning
– Simple design which allows quick break down for cleaning
– It’s able to “dump” a lot of material quickly and efficiently

In my opinion, the most attractive benefit of this is that the gelcoat does not require thinning. Whenever a material is thinned it displaces it’s properties. By this I am referring to UV-absorbers and pigments / color. A material that has been reduced will require a thicker film for the same level of protection versus un-thinned applications.  Also, when spraying laminating gelcoat (no wax additive), use of PVA will be required to achieve a full cure.

This being said, nothing is perfect. The downside of spraying thick material is that it will not give as smooth of a finish out of the gun, requiring more wetsanding to get the desired appearance.

The other style of gun mentioned is a typical gravity fed gun such as that shown here:

Gravity Gun

Use of this type of sprayer will require thinning the gelcoat to get proper atomization. These units are typically less expensive and can be viewed as semi-disposable. If the gelcoat happens to set up in the gun before cleaning, they can be replaced for $15-$20. Note: These cheap units will NOT provide a good finish with paints! A good paint gun can easily cost $500 or more 🙂

When we start to look at thinners (or more accurately gelcoat additives) there are two brands that I’ve used with good results. Duratec Clear High Gloss Additive, and Patch-Aid. These are both what are considered to be ‘reactive thinners’ rather than evaporative thinners. The difference being that reactive thinners actually become part of the gelcoat and cure together as one film. Evaporative thinners are as they sound, the solvent evaporates from the gelcoat leaving behind mostly straight gelcoat. Styrene and acetone would be examples of evaporative thinners. A lot of Pro’s use these types of thinners, however in my opinion they are more toxic to work with and not as ‘user friendly’. Personally I like to use additives such as the Duratec or Patch-aid.

Use of these additives does change the way that the overall mix needs to be catalyzed. Normal gelcoat should be catalyzed at around 1% – 1.25% Mek-P. When using these additives, the overall mix needs to be catalyzed at 2% or higher (it will be stated on the product container). Also, when these products are mixed in, no PVA is required to achieve a full cure.. That’s one of the benefits of these additives, and for this feature alone, I feel it makes them a very user friendly way to spray gelcoat for the DIY.. Also, because the material being sprayed has better atomization, it will provide a smoother finish out of the gun, requiring less wetsanding 🙂

HERE is a mixing chart showing the ratio’s for the various % of Mek-P courtesy of one of my local vendors, Express Composites.

Boat Build Update…

By | Boat Repair, Woodworking | One Comment

Hi Friends, I’ve gotten the options narrowed down on the possible designs for this Winter’s boat build. Basically there are two different directions to go:

Very simple (more of a quick and dirty with minimal amount of time, materials and character (something like this http://www.instantboats.com/teal.htm I should add that ‘Simple’ does not mean un-attractive; just less complicated 🙂

OR a more elaborate design something like this http://www.flickr.com/photos/nomadboatbuildi
ng/sets/72157631207839384/

The simple design would entail roughly 60 hours of work and cost under $1k and the more elaborate build would be closer to 200 hours and around $1700 depending on level of finish…

Both designs have an option for sail and rowing.

Which would you rather see / build? Please post a comment on my Facebook Page https://www.facebook.com/BoatworksToday and share this with anyone you think may be interested in watching or participating!!

Thank you!

~Andy

New Video! Shop Update And A Winter Boat Build :-)

By | Boat Repair, Woodworking | 2 Comments

http://blip.tv/boatworks-today/shop-update-and-boat-building-6314648

With how busy I am with my paying job, I unfortunately haven’t been able to get new video’s out as often as I would like. And until we get a little closer to Fall I don’t really see this changing 🙁 But, in the mean time I thought that a few of you may be interested to see what projects I’ve been working on in the shop! Mostly a lot of core replacements, fiberglass and painting! Busy, busy, busy… Like the saying goes, “Make hay while the sun shines!”

Something else that I’ve been doing over the Summer is trying to figure out a way to build a boat this Winter (yea, this is what I do for fun!!) I’ve posted an announcement on my home page going over more details on what I’m hoping to do. If you haven’t read it yet, CLICK THIS LINK!!

Also, please remember to TAKE THE SHORT SURVEY and share your thoughts on what would be most interesting for you to either watch or participate in!!!

Thank you!!

~Andy

Detailed Video On A Few Types Of Fiberglass Repair

By | Boat Repair, Fiberglassing Tools and Supplies | No Comments


OK, I wanted to provide enough detail for each type of fiberglass repair, but by doing so I wasn’t able to cover all of the different types of repairs that I wanted (at least in this video).. So, I had to break the content up a bit. BUT, there is a lot of good info in this as well as the next video to come! I promise 🙂 FYI, it is a 30 min video so set aside a little time to watch it all!! Remember to post a comment and pass this site along to anyone who might find it interesting!

Thank you!
~Andy